

How to create ID cards for students and export as image using Student ID Cards
In various educational institutions, Student ID Cards Maker Software is useful for designing identity cards for multiple students at same time with different barcode value and text. Software provide ‘Live Group and Batch Processing Mode’ to create ID cards for group of students using Excel data file. Student ID cards designing application easily installs on all latest Windows operating system and provides highly interactive graphical user interface to easily operate by any person without technical skills or knowledge. Student identity card maker software facilitates to quickly design ID cards using Pre-Defined templates. Software provides advance option to export designed ID card as Image (JPEG, GIF, PNG, BMP and TIFF), PDF file format and as Template. Student ID card designer program allows browsing all details from excel file while designing student ID cards.
- Software inbuilt Image Cropping Tool to crop single or multiple images for ID cards.
- Provide facility to send designed ID card at specified email address using advance Mail settings.
- Facilitate to add photo of student by capturing using camera or by browsing image path from system location while designing student ID cards.
- Provide various drawing tools including text, line, ellipse, rectangle, picture, symbols, image library, signature, barcode, watermark etc to design ID cards.
- Facilitate to make ID cards in different size and shapes including Rectangle, Rounded Rectangle and Ellipse.
- Provide option to copy current ID card design to other side of card.
- Advance printing settings to print created ID cards using all types of printers.
Step 1: Install Student ID Cards Maker Software on your Windows PC or Laptop to create ID cards for students as per your institutions.

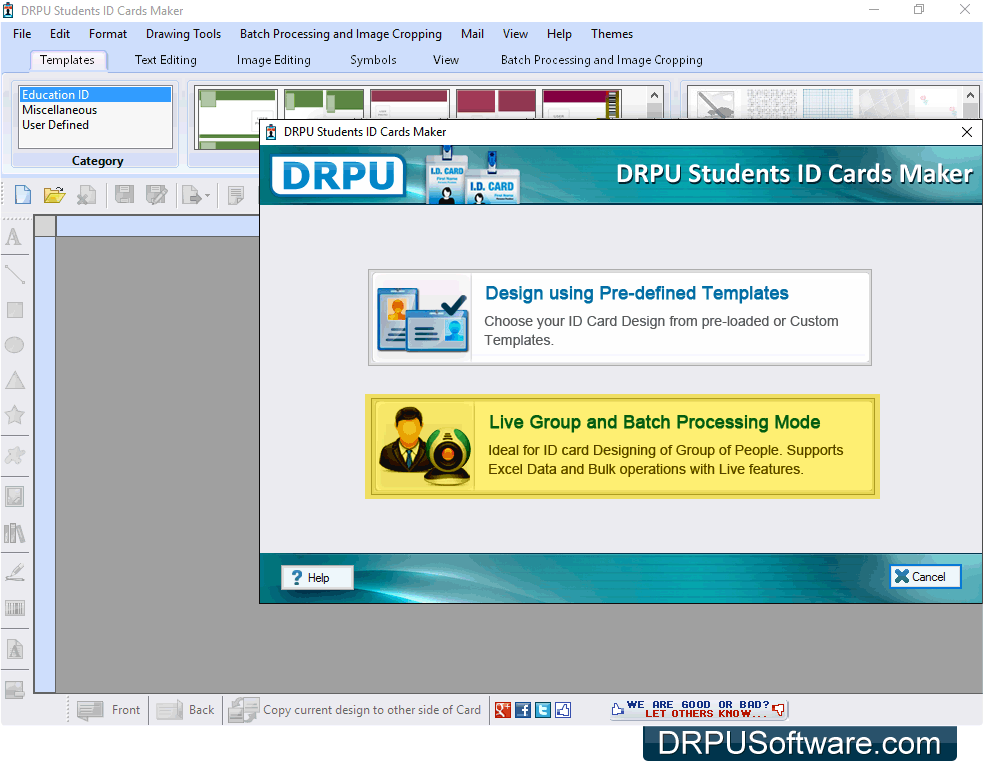
Step 2: Run DRPU Students ID Cards Maker, select any one mode from “Pre-Defined Templates” and “Live Group and Batch Processing Mode”. For demonstration purpose we have selected “Live Group and Batch Processing Mode” to generate multiple ID cards using excel data file.
Step 3: We have select “Start with new Project” option to start designing ID card with new project. If you want to design ID card with existing project then choose “Select existing Project” option. Now enter Project Name, Project Path and browse excel file path by clicking on “Import Excel” button. Click on “Next” button to continue.

Step 4: Select template either Pre-Defined or User Defined. We have chosen ‘User Defined’ template for designing ID card. Select card size, width and height as per need and click on “Next” button.

Step 5: Select “Excel Sheet” which contain student data and select “Excel Column” for their respective ID card field and click on “OK” button.

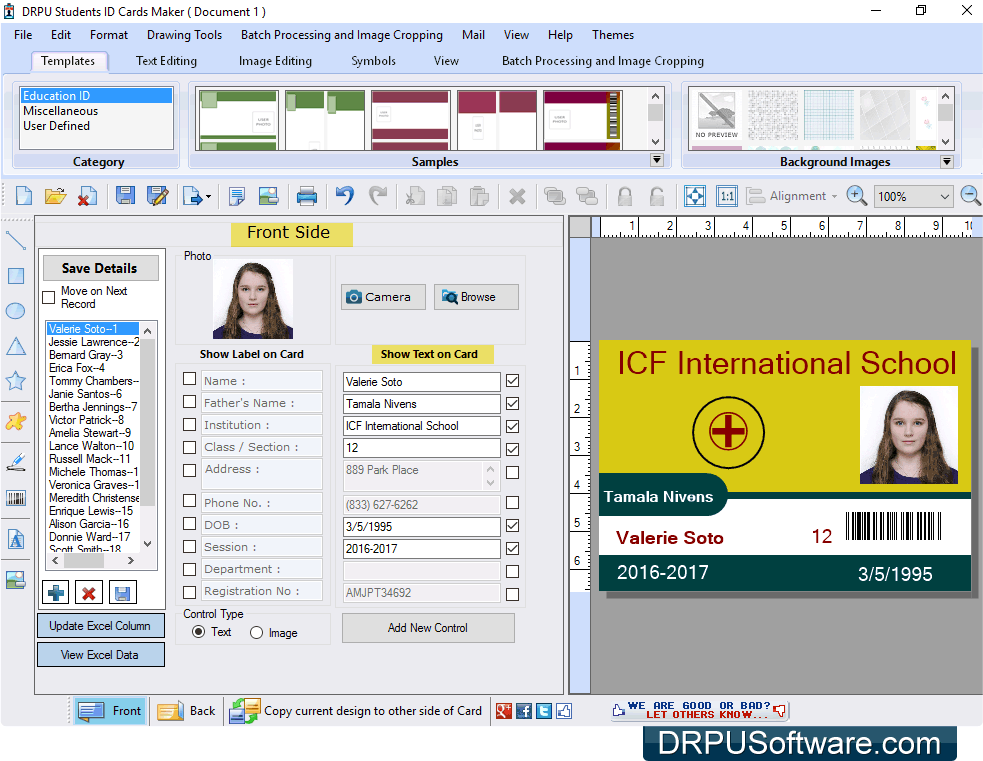
Step 6: Here you can see inserted data from excel file with all attributes. You can see particular ID card details when you click on saved ID card name in left panel. Check box to data show on front side of ID card.
Step 7: Click on ‘Back’ option and check box to data show on back side of ID card as per need.

Step 8: To export designed ID cards as Image in different format including JPEG, GIF, PNG, BMP and TIFF, go to ‘Standard Toolbar’, click on export option and select ‘Export as Image’ option as shown. You can also export designed ID card as PDF file format or as Template for future usage.

Step 9: Now select card side and image file format as per requirement. Press ‘OK’ button to save ID card image at specified location in computer system.

Step 10: If you want to print designed student ID cards, go to Standard Toolbar and click on “Print” option. Adjust printing settings as per required manner and press ‘Print’ button.

For more information contact us:
Email: support@drpusoftware.com
Website: www.drpusoftware.com